Gamification for Math Classes K-12
A simple game built with Unity3D Engine (C#) that can be applied and enjoyed by all levels and ages learning math, or any other subject!


Table of contents
- Introduction
- Project Outline:
- Step 1: Set up Unity Project
- Step 2: Create Bubble Prefab
- Step 3: Implement Bubble Movement and Bouncing (BubbleController.cs)
- Step 4: Generate Math Facts (MathFactGenerator.cs)
- Step 5: Pop Bubble on Correct Answer (BubbleController.cs)
- Step 6: Game Manager (GameManager.cs)
- Step 7: User Interface
- Complete Code
- File Structure
- How to Run the Game:
- Conclusion
Introduction
We are going to create an enhanced version of whack-a-mole. In fact, its way cooler than whack-a-mole, as you learn while having fun given many more features than smacking poor animals with hammers when they appear 🙉 !!! Yes, I realize that is a monkey, not a mole... submit your mole emoji here if you'd like me to make the edit 😜
No, this game has true and false math facts that are simple enough to comprehend and fit in a bubble and can be created for all grades and skill levels, and again, other subjects.
FROM
$$1+2=3$$
TO
$$\left.x^2\right\rvert_3^5 = 5^2-3^2$$
TO

Below is an outline of each step we need to accomplish to complete the entire game followed by the code and descriptions to follow along with.
If you are here to learn and retain this process for self-improvement or to use it in a resume/portfolio, I HIGHLY suggest typing out the code and avoiding the tempting
⌘C + ⌘V.
Project Outline:
Set up Unity Project:
Install Unity if you haven't already.
Create a new Unity 2D project.
Create Bubble Prefab:
Create a new empty GameObject and add a Sprite Renderer component to it.
Add a circular sprite to the Sprite Renderer, representing the bubble.
Attach a Rigidbody2D component to the GameObject.
Create a new C# script called "BubbleController" and attach it to the bubble GameObject.
Implement Bubble Movement and Bouncing:
In the "BubbleController" script, write code to apply random force to the Rigidbody2D during Start() to make it move.
Implement code in FixedUpdate() to check for collisions with the walls of the screen and other bubbles, and apply appropriate forces to simulate bouncing.
Generate Math Facts:
Create a new C# script called "MathFactGenerator" to generate random simple math facts.
Use random number generators to create simple math equations like addition and subtraction with values within a certain range.
Pop Bubble on Correct Answer:
Attach a collider (Circle Collider 2D) to the bubble GameObject to detect clicks on the bubble.
In the "BubbleController" script, implement code to detect clicks on the bubble and check if the user clicked the correct answer.
If the user clicked the correct answer, destroy the bubble GameObject and generate a new bubble with a new math fact.
Game Manager:
Create a new empty GameObject and attach a new C# script called "GameManager" to it.
In this script, manage the spawning of bubbles at regular intervals (5 seconds) and keep track of the game state (score, time, etc.).
User Interface:
Design a simple UI to display the math fact and the player's score and time remaining.
Update the UI through the GameManager script as the game progresses.
Step 1: Set up Unity Project
Install Unity Hub:
Open Unity Hub:
- Launch Unity Hub after the installation is complete.
Sign in or Create Unity ID:
- If you have a Unity ID, sign in. Otherwise, create a new Unity ID.
Create a New Project:
Click on the "New" button in the top-right corner of Unity Hub.
Select "2D" from the "Template" drop-down menu to create a 2D project.
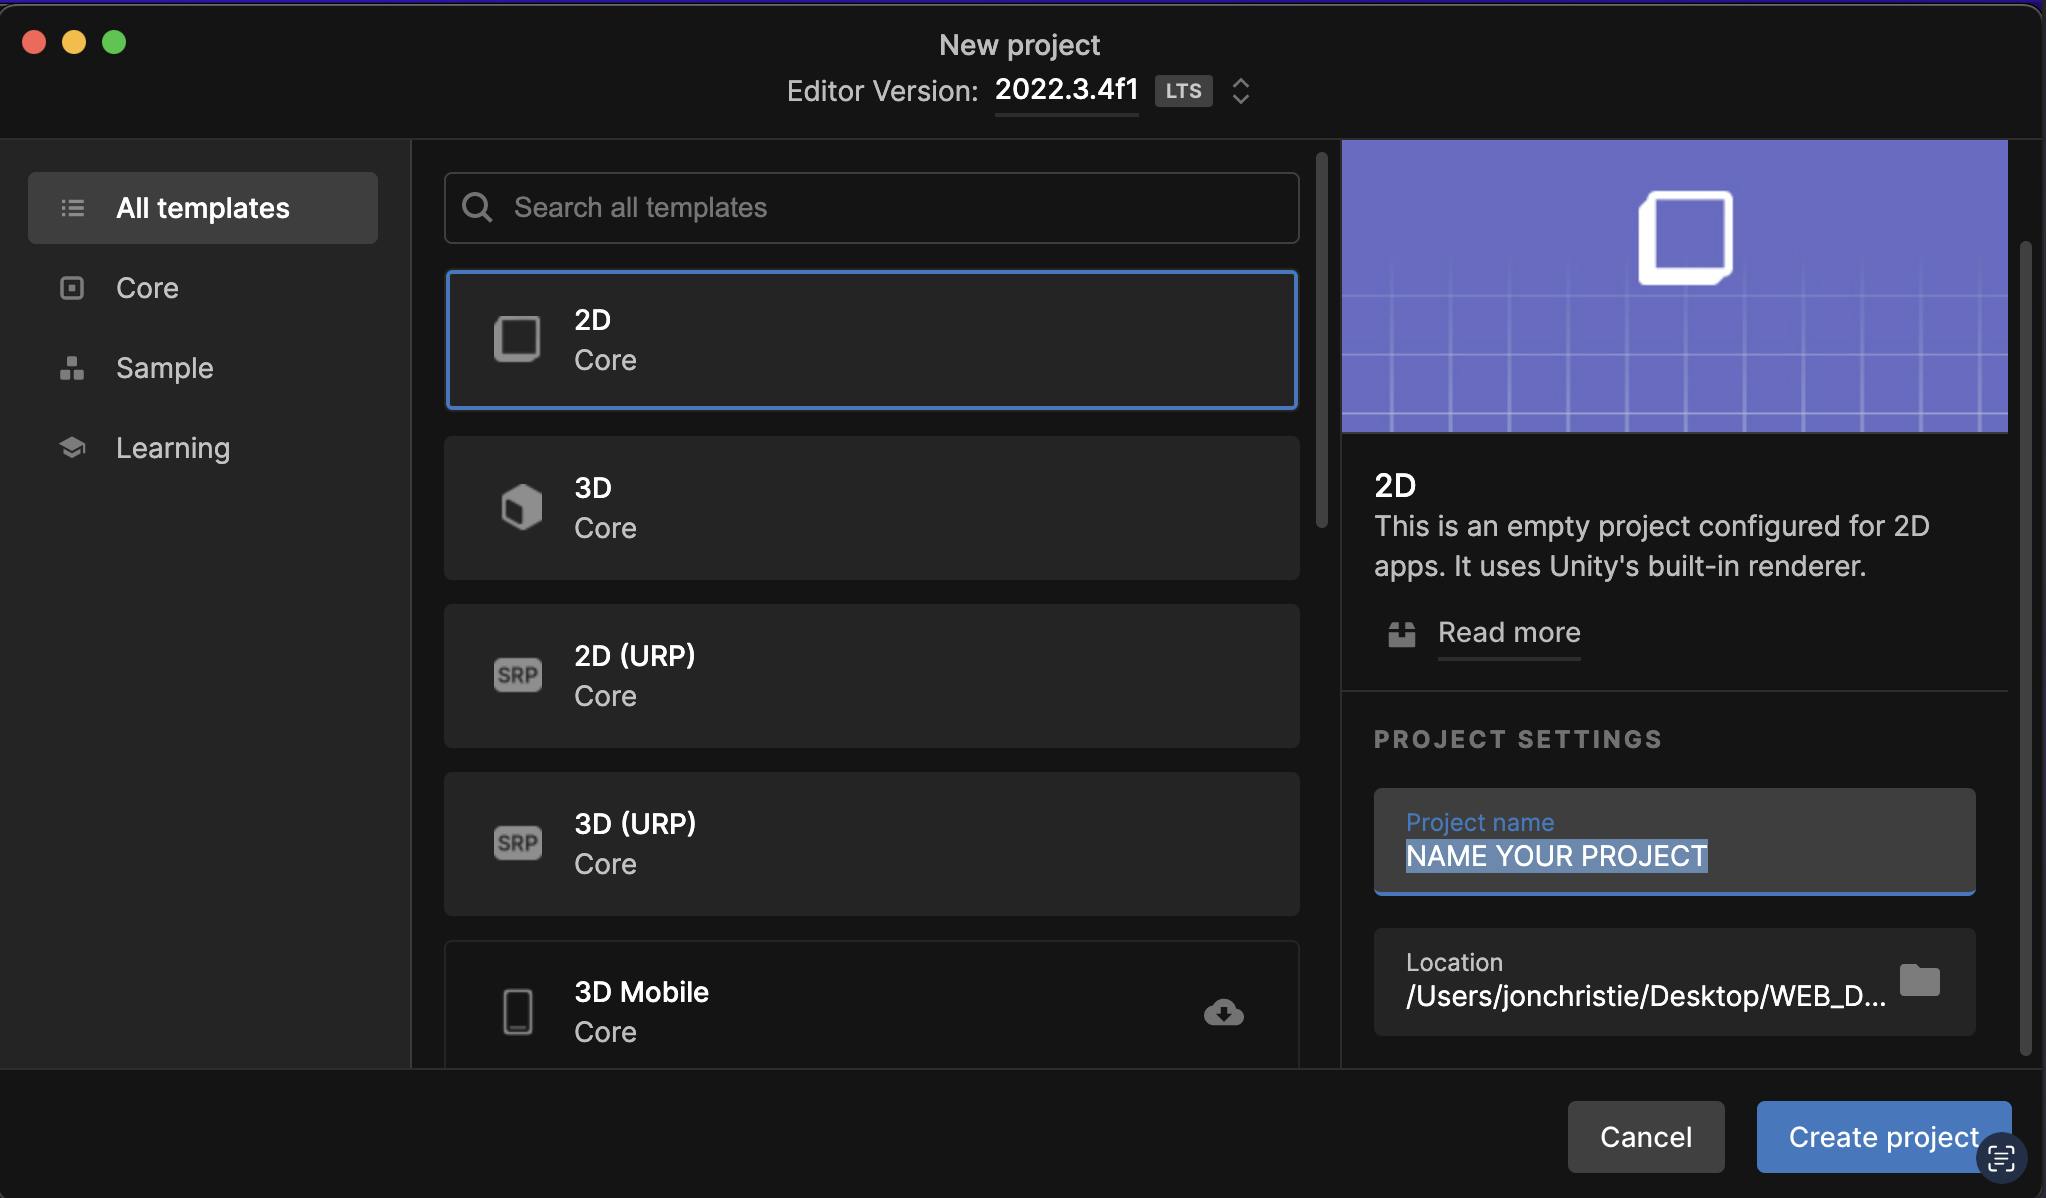
Choose a project name and set the location where you want to save the project files.
Set other project settings, such as the Unity version (recommended to use the latest LTS version).
Click the "Create Project" button to create the new Unity 2D project.
Open Unity Editor:
- Unity Hub will now create the project and open the Unity Editor.
Step 2: Create Bubble Prefab
Create an empty GameObject:
Right-click in the Hierarchy panel.
Choose "Create Empty" to create an empty GameObject.
Rename the GameObject to "Bubble".
Add a Sprite Renderer component:
With the "Bubble" GameObject selected, go to the Inspector panel.
Click on "Add Component" and search for "Sprite Renderer."
Click on "Sprite Renderer" to add the component.
Add a circular sprite:
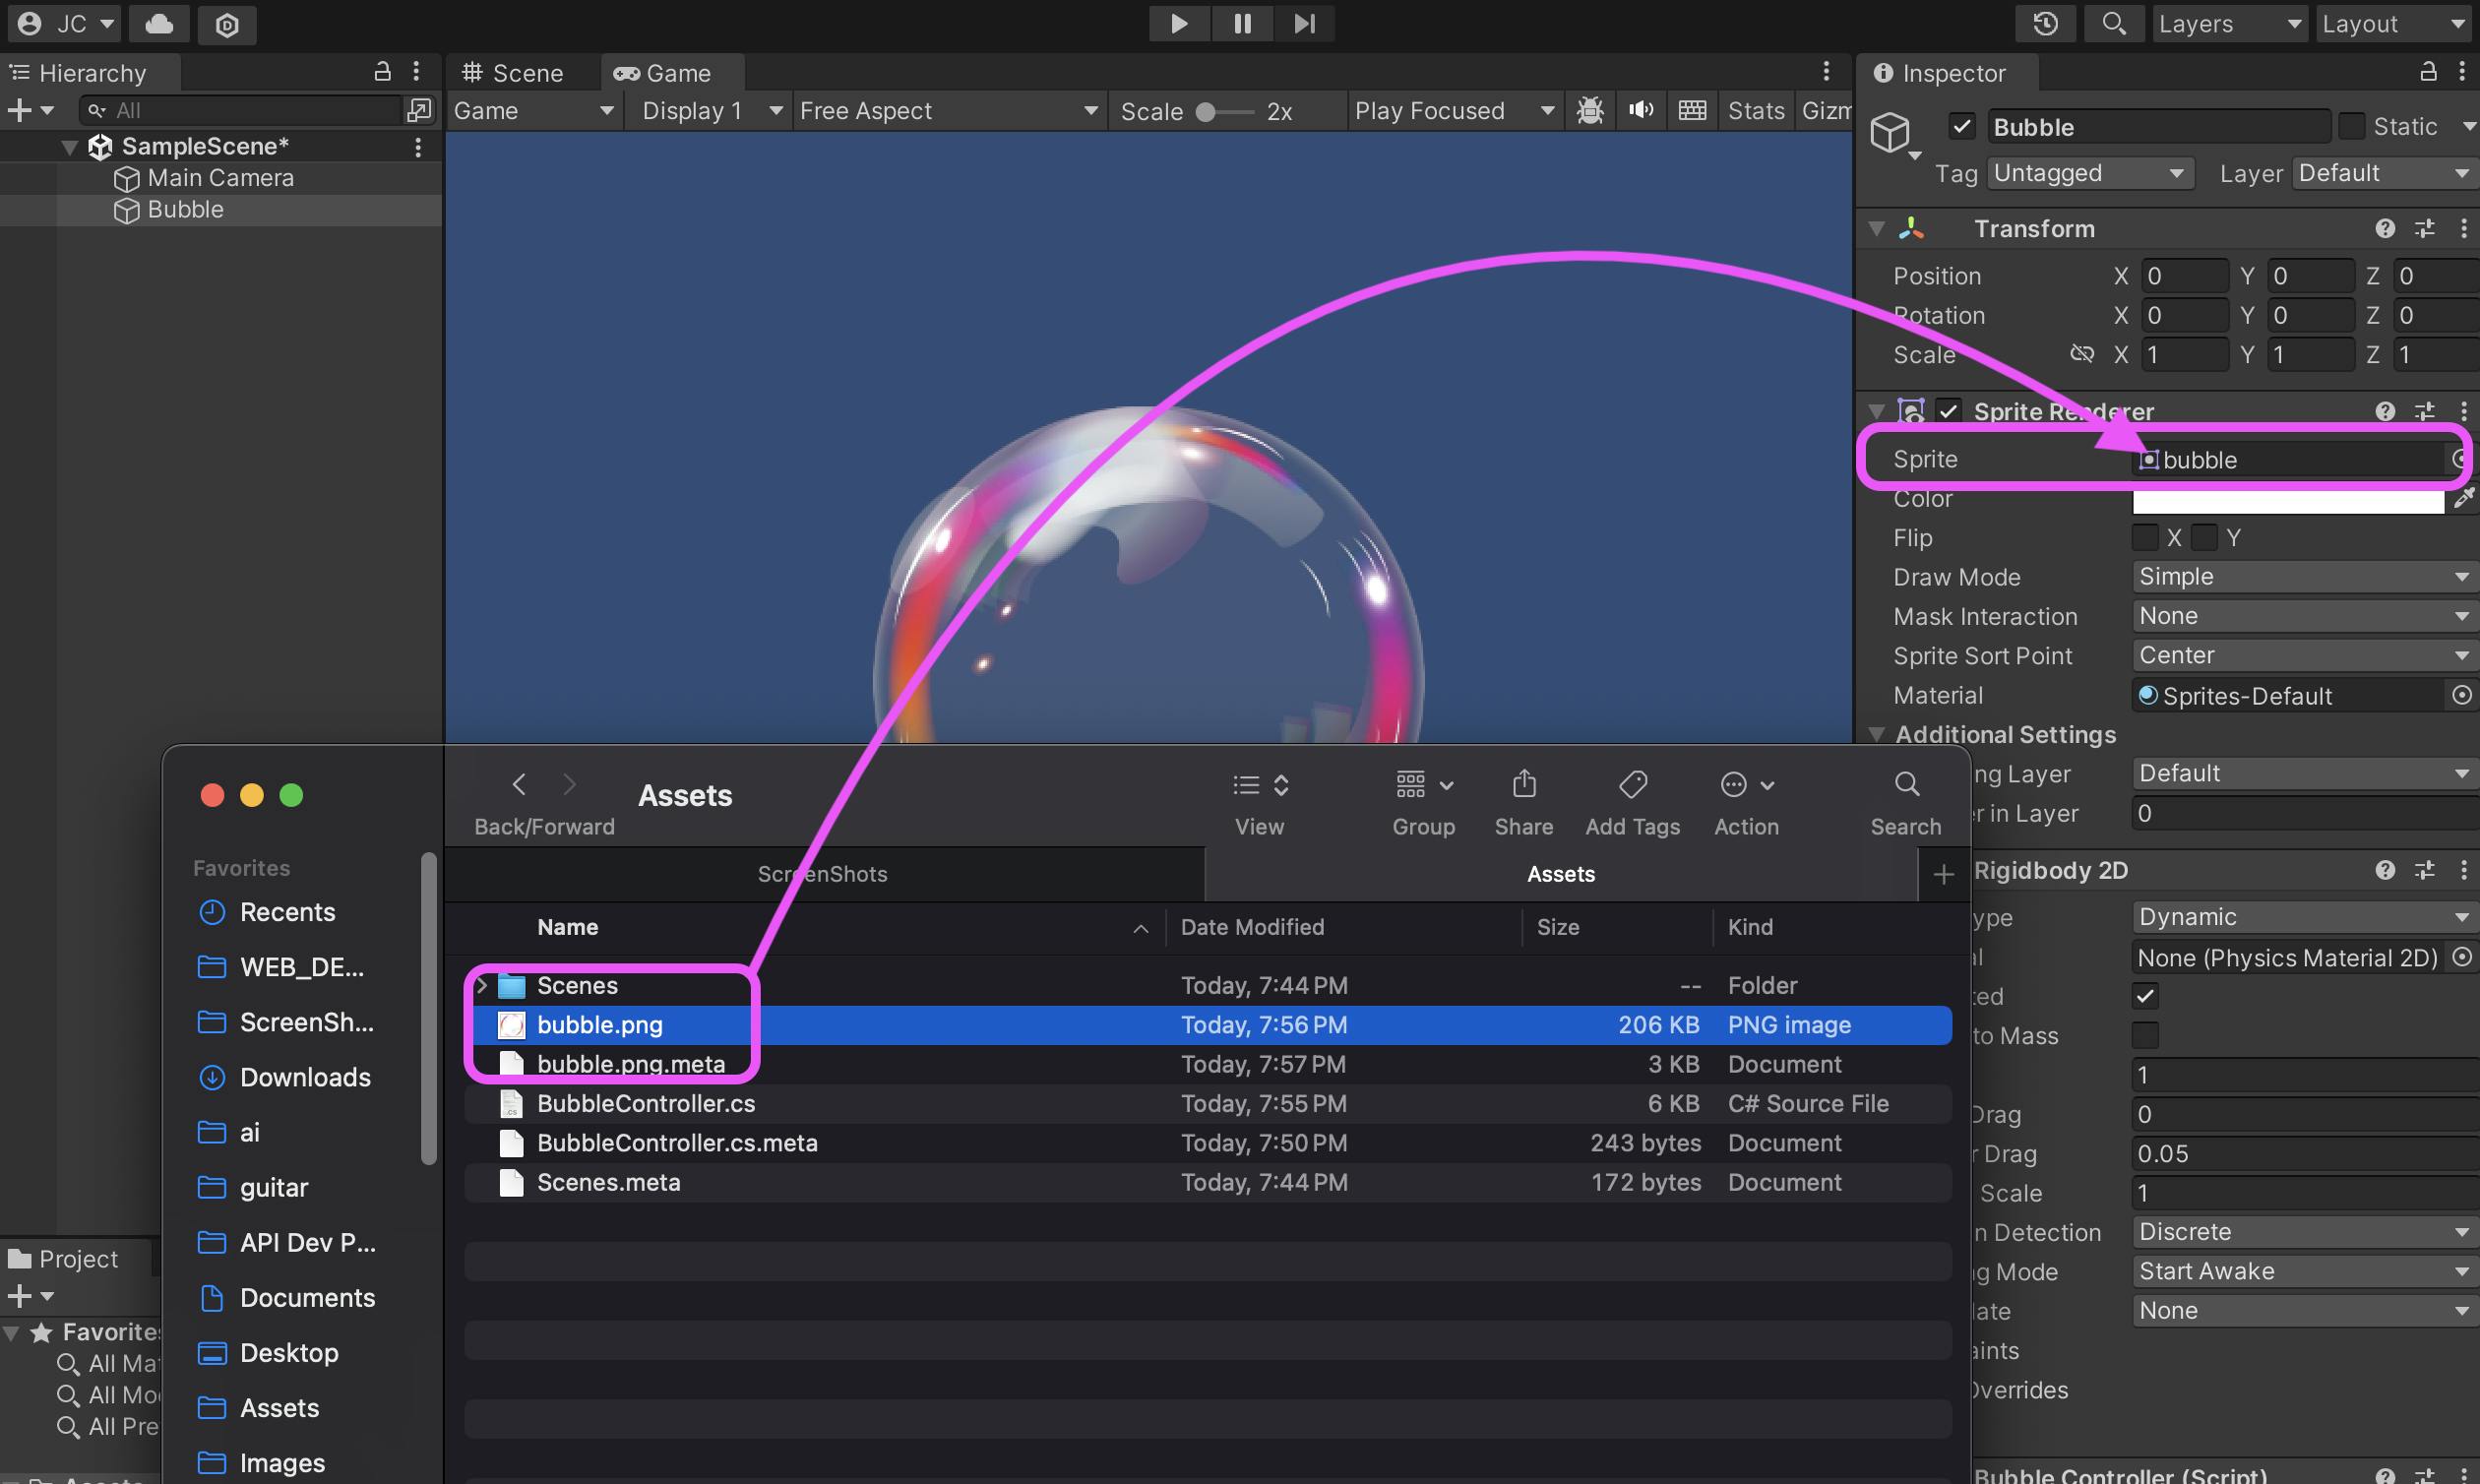
Import or create a circular sprite representing the bubble (a PNG or JPEG image file). Feel free to right-click this one and save it.

Drag and drop the sprite image onto the "Sprite Renderer" component's "Sprite" field in the Inspector.

Attach a Rigidbody2D component:
With the "Bubble" GameObject still selected, go to the Inspector panel.
Click on "Add Component" and search for "Rigidbody2D."
Click on "Rigidbody2D" to add the component.

Create a new C# script called "BubbleController":
In the Unity Editor, right-click in the Project panel (Assets) to create a new C# script.
Name the script "BubbleController.cs".
Double-click the script to open it in your preferred code editor (e.g., Visual Studio).
Add the script to the bubble GameObject:
With the "BubbleController.cs" script open in your code editor, go back to the Unity Editor. I use VS Code, but feel free to use any code editor of your choice.
Drag and drop the "BubbleController.cs" script onto the "Bubble" GameObject in the Hierarchy panel.
Now the script should be attached to the "Bubble" GameObject in the Inspector panel.
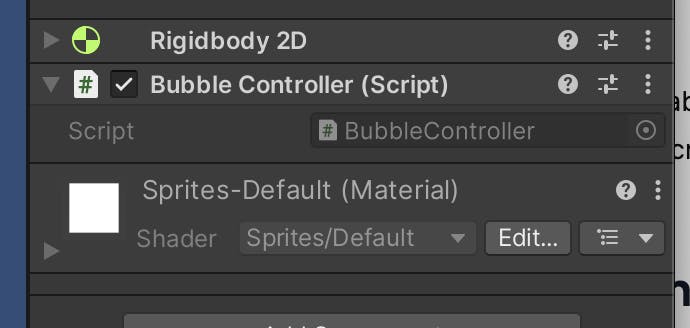
Now you have a Bubble Prefab with a Sprite Renderer and Rigidbody2D components, and the "BubbleController" script is attached to it.
Step 3: Implement Bubble Movement and Bouncing (BubbleController.cs)
// Importing the Unity Engine namespace to access its
// classes and functions
using UnityEngine;

// Defining a class named BubbleController that inherits
// from MonoBehaviour
public class BubbleController : MonoBehaviour
{
    // Public variables to set the range of forces applied to
    // the bubble
    public float minForce = 2f;
    public float maxForce = 4f;

    // Private variable to hold a reference to the Rigidbody2D
    // component
    private Rigidbody2D rb;

    // This function is called when the object is created
    void Start()
    {
        // Getting the reference to the Rigidbody2D component
        // attached to this object
        rb = GetComponent<Rigidbody2D>();
        // Applying a random force to the bubble
        ApplyRandomForce();
    }

    // This function is called at a fixed interval
    void FixedUpdate()
    {
        // Making the bubble bounce off walls
        BounceOffWalls();
    }

    // This function applies a random force to the bubble
    private void ApplyRandomForce()
    {
        // Generating a random magnitude for the force
        // within the specified range
        float forceMagnitude = Random.Range(minForce, maxForce);
        // Generating a random angle in degrees
        float angle = Random.Range(0f, 360f);
        // Calculating the x and y components of the
        // force using trigonometry
        Vector2 force = new Vector2(forceMagnitude * Mathf.Cos(angle), forceMagnitude * Mathf.Sin(angle));
        // Applying the calculated force to the bubble
        rb.AddForce(force, ForceMode2D.Impulse);
    }

    // This function makes the bubble bounce off walls
    private void BounceOffWalls()
    {
        // Converting the bubble's world position to a
        // position on the viewport
        Vector2 viewportPosition = Camera.main.WorldToViewportPoint(transform.position);

        // Checking if the bubble's x-coordinate is outside
        // the viewport's range
        if (viewportPosition.x < 0f || viewportPosition.x > 1f)
        {
            // Inverting the x-component of the bubble's
            // velocity to make it bounce off horizontally
            rb.velocity = new Vector2(-rb.velocity.x, rb.velocity.y);
        }

        // Checking if the bubble's y-coordinate is outside
        // the viewport's range
        if (viewportPosition.y < 0f || viewportPosition.y > 1f)
        {
            // Inverting the y-component of the bubble's
            // velocity to make it bounce off vertically
            rb.velocity = new Vector2(rb.velocity.x, -rb.velocity.y);
        }
    }
}
Step 4: Generate Math Facts (MathFactGenerator.cs)
Step 4: Generate Math Facts (MathFactGenerator.cs)
Create a new C# script:
In the Unity Editor, right-click in the Project panel (Assets).
Choose "Create" > "C# Script".

Name the script "MathFactGenerator.cs".
Double-click the script to open it in your preferred code editor (e.g., Visual Studio).
- Implement the MathFactGenerator script:
// Importing a library called "UnityEngine" for making games
using UnityEngine;

// Declares a class or a blueprint called "MathFactGenerator"
public class MathFactGenerator : MonoBehaviour
{
    // Declare public integer variables minValue and maxValue. Which can be used inside or outside this class
    public int minValue = 1;
    public int maxValue = 10;

    // Declare an array of strings called operators. This stores the "+" and "-" symbols
    public string[] operators = new string[] { "+", "-" };

    // Create private variables: a TextMesh called mathFactText and an integer called result.
    private TextMesh mathFactText;
    private int result;

    // The Start function is part of Unity's game loop and is called once when the game starts
    void Start()
    {
        // We get the TextMesh component from this object or its children and assign it to mathFactText
        mathFactText = GetComponentInChildren<TextMesh>();

        // Call the GenerateNewMathFact method
        GenerateNewMathFact();
    }

    // This function generates a new math fact
    public void GenerateNewMathFact()
    {
        // Generate and store random number between minValue and maxValue (inclusive) in variable 'a' and 'b'
        int a = Random.Range(minValue, maxValue + 1);
        int b = Random.Range(minValue, maxValue + 1);

        // Selects a random operator from the operators array and stores it in variable 'op'
        string op = operators[Random.Range(0, operators.Length)];

        // If the operator is a "+", then we add 'a' and 'b' and store the result
        if (op == "+")
        {
            result = a + b;
        }
        // If the operator is a "-", then we subtract 'b' from 'a' and store the result
        else if (op == "-")
        {
            result = a - b;
        }

        // Update the text of our TextMesh to show the new math fact.
        // The '?' denotes that the user should solve the problem.
        mathFactText.text = $"{a} {op} {b} = ?";
    }
}
Attach the MathFactGenerator script to the bubble GameObject:
Drag and drop the "MathFactGenerator.cs" script onto the "Bubble" GameObject in the Hierarchy panel.
Create a 3D Text object as a child of the "Bubble" GameObject:
Right-click on the "Bubble" GameObject in the Hierarchy panel.
Choose "3D Object" > "3D Text".
A new 3D Text object should be created as a child of the "Bubble" GameObject.
Adjust the position and size of the 3D Text to make it fit inside the bubble sprite.
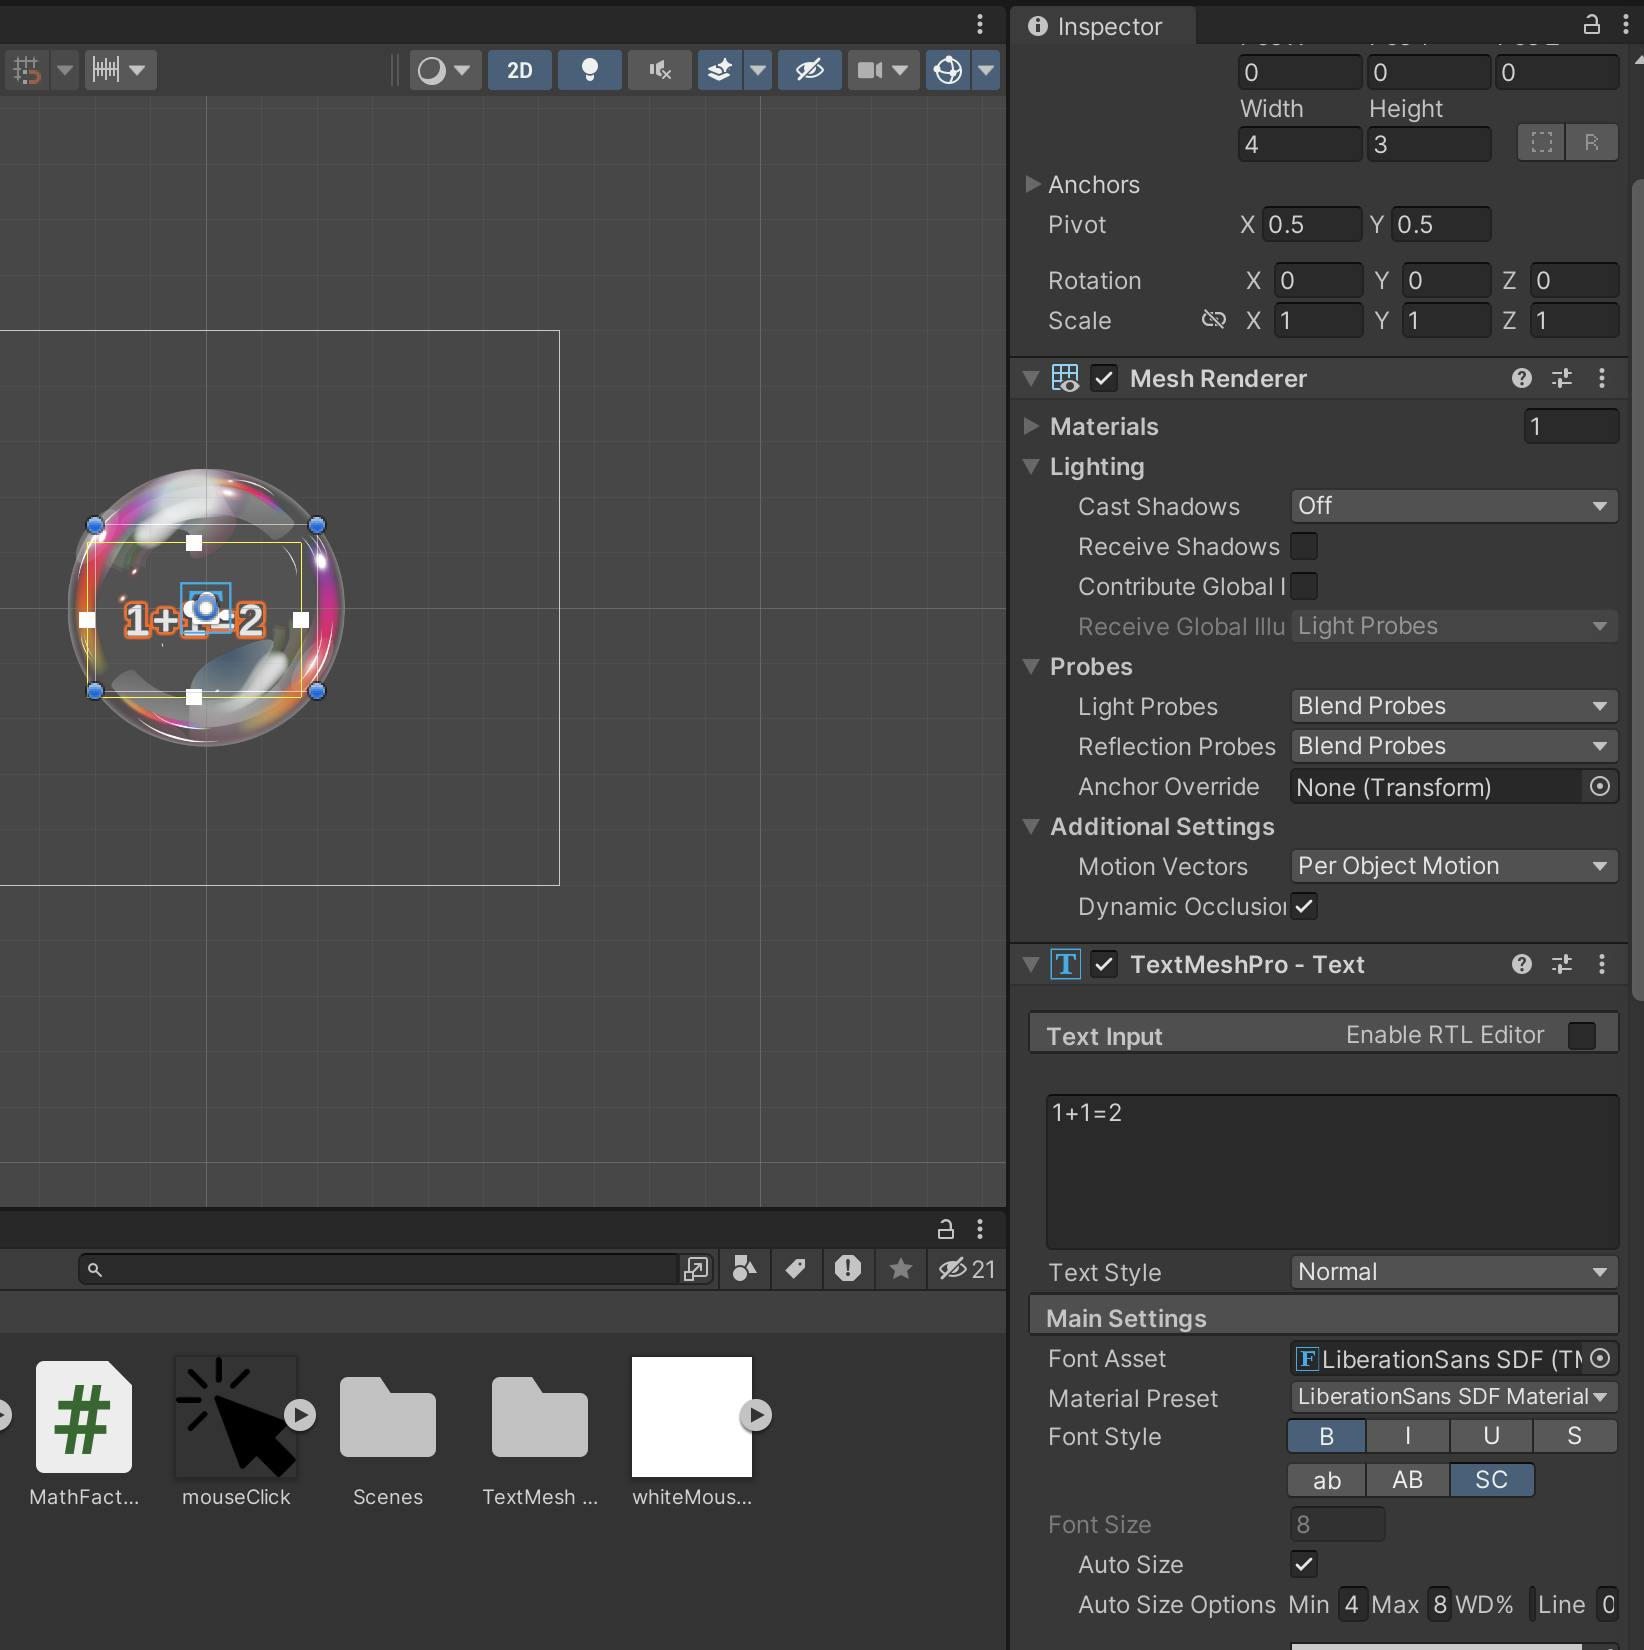
Now you have a "MathFactGenerator" script that generates random math facts like addition and subtraction and displays them as 3D text inside the bubble GameObject. The MathFactGenerator script is attached to the bubble GameObject, and you can use it to generate new math facts when a new bubble is created.
Step 5: Pop Bubble on Correct Answer (BubbleController.cs)
Add Circle Collider 2D to the bubble GameObject:
With the "Bubble" GameObject selected, go to the Inspector panel.
Click on "Add Component" and search for "Circle Collider 2D."
Click on "Circle Collider 2D" to add the component.
Adjust the collider's size and position to fit the bubble sprite.
Implement the PopBubble() method in the "BubbleController" script:
using UnityEngine;
using UnityEngine.EventSystems;

public class BubbleController : MonoBehaviour
{
    // ... (Previous code)

    private GameManager gameManager;

    void Start()
    {
        rb = GetComponent<Rigidbody2D>();
        gameManager = GameObject.FindObjectOfType<GameManager>();
        ApplyRandomForce();
    }

    void FixedUpdate()
    {
        BounceOffWalls();
    }

    public void PopBubble()
    {
        // Check if the bubble has a MathFactGenerator script attached.
        MathFactGenerator mathFactGenerator = GetComponent<MathFactGenerator>();
        if (mathFactGenerator != null)
        {
            string mathFactText = mathFactGenerator.mathFactText.text;
            int result = int.Parse(mathFactText.Split('=')[1].Trim());

            // Check if the user clicked the correct answer (by checking if the bubble's value matches the result).
            int userAnswer = int.Parse(EventSystem.current.currentSelectedGameObject.name);
            if (userAnswer == result)
            {
                // Correct answer: Destroy the bubble and generate a new one.
                gameManager.IncrementScore(); // Increase the player's score.
                mathFactGenerator.GenerateNewMathFact();
                Destroy(gameObject);
            }
        }
    }
}
Attach the BubbleController script to the bubble GameObject:
- If you haven't already, attach the "BubbleController.cs" script to the "Bubble" GameObject in the Hierarchy panel.
Create Buttons for Answer Choices:
Create four UI buttons labeled with numbers 0 to 3.
Add the "PopBubble" method as the OnClick event for each button, passing the button's number as a parameter (e.g., "0" for the button labeled "0").
Implement GameManager script:
- Refer to the GameManager script provided in Step 6 of the previous response to handle scoring and spawning new bubbles.
With these steps completed, your game should now allow the player to click on the bubble with the correct answer to make it pop, increasing their score, and then generating a new bubble with a new math fact.
Step 6: Game Manager (GameManager.cs)
Create a new C# script for the GameManager:
In the Unity Editor, right-click in the Project panel (Assets).
Choose "Create" > "C# Script".
Name the script "GameManager.cs".
Double-click the script to open it in your preferred code editor (e.g., Visual Studio).
Implement the GameManager script:
using UnityEngine;
using UnityEngine.UI;

public class GameManager : MonoBehaviour
{
    public GameObject bubblePrefab;
    public Transform bubbleSpawnPoint;
    public float spawnInterval = 5f;

    private Text scoreText;
    private int score = 0;

    void Start()
    {
        scoreText = GameObject.Find("ScoreText").GetComponent<Text>();
        InvokeRepeating("SpawnBubble", 0f, spawnInterval);
    }

    void SpawnBubble()
    {
        GameObject bubble = Instantiate(bubblePrefab, bubbleSpawnPoint.position, Quaternion.identity);
        // Attach the MathFactGenerator script to the bubble.
        MathFactGenerator mathFactGenerator = bubble.AddComponent<MathFactGenerator>();
        mathFactGenerator.mathFactText = bubble.GetComponentInChildren<TextMesh>();
    }

    public void IncrementScore()
    {
        score++;
        scoreText.text = "Score: " + score;
    }
}
Attach the GameManager script to an empty GameObject:
In the Unity Editor, create an empty GameObject by right-clicking in the Hierarchy panel and choosing "Create Empty."
Select the empty GameObject in the Hierarchy panel.
Drag and drop the "GameManager.cs" script onto the empty GameObject in the Inspector panel.
Create UI Text for displaying the score:
Create a UI Text element by right-clicking in the Hierarchy panel and choosing "UI" > "Text".
Rename the newly created Text object to "ScoreText".
Position the Text object on the screen where you want the score to be displayed.
Adjust the font size, color, and other properties as desired.
Link the UI Text to the GameManager script:
Select the empty GameObject with the GameManager script in the Hierarchy panel.
In the Inspector panel, drag the "ScoreText" Text object and drop it onto the "Score Text" field in the GameManager component.
Now you have a GameManager script attached to an empty GameObject in the scene. The GameManager is responsible for spawning bubbles at regular intervals and keeping track of the player's score. The score is displayed using the UI Text element you created, and the bubbles are created with a MathFactGenerator script attached to them.
Step 7: User Interface
Create a Dark UI Canvas:
In the Unity Editor, go to the Hierarchy panel.
Right-click and choose "UI" > "Canvas".
Select the newly created Canvas in the Hierarchy.
In the Inspector panel, change the Canvas component's "Render Mode" to "Screen Space - Overlay".
Create an empty GameObject (right-click > Create Empty) and name it "UIManager".
Drag and drop the "UIManager" GameObject onto the Canvas to make it a child.
Add Dark Background Panel:
Right-click on the "UIManager" GameObject and choose "UI" > "Panel".
Name the new Panel "BackgroundPanel".
In the Inspector panel, set the Panel's width and height to stretch to fill the Canvas.
Select the Panel GameObject, and in the Inspector, change the color to a dark background color (e.g., #333333FF).
Add UI Text for Math Fact and Score:
Right-click on the "UIManager" GameObject and choose "UI" > "Text".
Name the new Text object "MathFactText".
Position the Text element where you want the math fact to be displayed.
Adjust the font size, color, and other properties for dark mode readability.
Add UI Text for Score:
Right-click on the "UIManager" GameObject and choose "UI" > "Text".
Name the new Text object "ScoreText".
Position the Text element where you want the score to be displayed.
Adjust the font size, color, and other properties for dark mode readability.
Update the GameManager script:
using UnityEngine;
using UnityEngine.UI;

public class GameManager : MonoBehaviour
{
    public GameObject bubblePrefab;
    public Transform bubbleSpawnPoint;
    public float spawnInterval = 5f;

    private Text mathFactText;
    private Text scoreText;
    private int score = 0;

    void Start()
    {
        mathFactText = GameObject.Find("MathFactText").GetComponent<Text>();
        scoreText = GameObject.Find("ScoreText").GetComponent<Text>();
        InvokeRepeating("SpawnBubble", 0f, spawnInterval);
    }

    void SpawnBubble()
    {
        GameObject bubble = Instantiate(bubblePrefab, bubbleSpawnPoint.position, Quaternion.identity);
        // Attach the MathFactGenerator script to the bubble.
        MathFactGenerator mathFactGenerator = bubble.AddComponent<MathFactGenerator>();
        mathFactGenerator.mathFactText = bubble.GetComponentInChildren<TextMesh>();
    }

    public void IncrementScore()
    {
        score++;
        scoreText.text = "Score: " + score;
    }

    public void UpdateMathFactText(string text)
    {
        mathFactText.text = text;
    }
}
Attach GameManager to UIManager GameObject:
Create an empty GameObject and name it "GameManager".
Drag and drop the "GameManager.cs" script onto the "GameManager" GameObject.
Drag the "GameManager" GameObject and drop it onto the "UIManager" GameObject to make it a child.
Now you have a dark-mode UI for the bubble popping game, displaying the math fact and player's score. The GameManager script is responsible for updating the UI as the game progresses. Remember to adjust the colors and font properties to fit your dark mode design.
Complete Code
Sure! Here are the complete C# script files for the BubbleController.cs, MathFactGenerator.cs, and GameManager.cs:
- BubbleController.cs
using UnityEngine;

public class BubbleController : MonoBehaviour
{
    public float minForce = 2f;
    public float maxForce = 4f;

    private Rigidbody2D rb;

    void Start()
    {
        rb = GetComponent<Rigidbody2D>();
        ApplyRandomForce();
    }

    void FixedUpdate()
    {
        BounceOffWalls();
    }

    private void ApplyRandomForce()
    {
        float forceMagnitude = Random.Range(minForce, maxForce);
        float angle = Random.Range(0f, 360f);
        Vector2 force = new Vector2(forceMagnitude * Mathf.Cos(angle), forceMagnitude * Mathf.Sin(angle));
        rb.AddForce(force, ForceMode2D.Impulse);
    }

    private void BounceOffWalls()
    {
        Vector2 viewportPosition = Camera.main.WorldToViewportPoint(transform.position);
        if (viewportPosition.x < 0f || viewportPosition.x > 1f)
        {
            rb.velocity = new Vector2(-rb.velocity.x, rb.velocity.y);
        }

        if (viewportPosition.y < 0f || viewportPosition.y > 1f)
        {
            rb.velocity = new Vector2(rb.velocity.x, -rb.velocity.y);
        }
    }

    public void PopBubble()
    {
        MathFactGenerator mathFactGenerator = GetComponent<MathFactGenerator>();
        if (mathFactGenerator != null)
        {
            string mathFactText = mathFactGenerator.mathFactText.text;
            int result = int.Parse(mathFactText.Split('=')[1].Trim());

            int userAnswer = int.Parse(UnityEngine.EventSystems.EventSystem.current.currentSelectedGameObject.name);
            if (userAnswer == result)
            {
                GameManager gameManager = FindObjectOfType<GameManager>();
                if (gameManager != null)
                {
                    gameManager.IncrementScore();
                }
                mathFactGenerator.GenerateNewMathFact();
                Destroy(gameObject);
            }
        }
    }
}
- MathFactGenerator.cs
using UnityEngine;

public class MathFactGenerator : MonoBehaviour
{
    public int minValue = 1;
    public int maxValue = 10;

    public string[] operators = new string[] { "+", "-" };

    public TextMesh mathFactText;

    void Start()
    {
        GenerateNewMathFact();
    }

    public void GenerateNewMathFact()
    {
        int a = Random.Range(minValue, maxValue + 1);
        int b = Random.Range(minValue, maxValue + 1);
        string op = operators[Random.Range(0, operators.Length)];

        int result = 0;
        if (op == "+")
        {
            result = a + b;
        }
        else if (op == "-")
        {
            result = a - b;
        }

        mathFactText.text = $"{a} {op} {b} = ?";
        ApplyRandomForce();
    }

    private void ApplyRandomForce()
    {
        float forceMagnitude = Random.Range(2f, 4f);
        float angle = Random.Range(0f, 360f);
        Vector2 force = new Vector2(forceMagnitude * Mathf.Cos(angle), forceMagnitude * Mathf.Sin(angle));
        GetComponent<Rigidbody2D>().AddForce(force, ForceMode2D.Impulse);
    }
}
- GameManager.cs
using UnityEngine;
using UnityEngine.UI;

public class GameManager : MonoBehaviour
{
    public GameObject bubblePrefab;
    public Transform bubbleSpawnPoint;
    public float spawnInterval = 5f;

    private Text scoreText;
    private int score = 0;

    void Start()
    {
        scoreText = GameObject.Find("ScoreText").GetComponent<Text>();
        InvokeRepeating("SpawnBubble", 0f, spawnInterval);
    }

    void SpawnBubble()
    {
        GameObject bubble = Instantiate(bubblePrefab, bubbleSpawnPoint.position, Quaternion.identity);
        MathFactGenerator mathFactGenerator = bubble.AddComponent<MathFactGenerator>();
        mathFactGenerator.mathFactText = bubble.GetComponentInChildren<TextMesh>();
    }

    public void IncrementScore()
    {
        score++;
        scoreText.text = "Score: " + score;
    }
}
Remember to attach the appropriate scripts to the corresponding GameObjects and design the dark-mode UI according to your preferences.
File Structure
YourGameFolder/
├── Assets/
│   ├── Scenes/
│   │   └── MainScene.unity
│   ├── Scripts/
│   │   ├── BubbleController.cs
│   │   ├── MathFactGenerator.cs
│   │   └── GameManager.cs
│   └── Sprites/
│       └── BubbleSprite.png
└── ProjectSettings/
    └── ... (Other Unity project settings files)
Explanation:
YourGameFolder: The root folder of your Unity project.
Assets: Contains all the assets used in the game, such as scenes, scripts, and sprites.
Scenes: Contains the MainScene.unity, which is the main scene of the game.
Scripts: Contains the three C# scripts - BubbleController.cs, MathFactGenerator.cs, and GameManager.cs.
Sprites: Contains BubbleSprite.png, which is the circular sprite representing the bubble.
ProjectSettings: Contains Unity project settings files (auto-generated by Unity).
How to Run the Game:
Open Unity:
- Launch Unity Hub and open your project by selecting the YourGameFolder.
Set Up the Scene:
In the Project panel, navigate to the Scenes folder and double-click MainScene.unity to open it.
In the Hierarchy panel, create an empty GameObject and name it "GameManager."
Drag and drop the GameManager.cs script onto the GameManager GameObject.
Create another empty GameObject and name it "UIManager."
Design the dark-mode UI as explained in Step 3 of the previous response.
Attach the Text elements and other UI components to the GameManager script in the UIManager GameObject.
Set Up Prefabs:
In the Project panel, navigate to the Scripts folder and create an empty GameObject.
Add a Sprite Renderer component to the GameObject and drag and drop BubbleSprite.png onto the Sprite Renderer's "Sprite" field.
Add a Rigidbody2D component to the GameObject.
Attach the BubbleController.cs script to the GameObject.
Set Up BubbleSpawnPoint:
In the Hierarchy panel, create an empty GameObject and position it where you want the bubbles to spawn during the game.
Name the GameObject "BubbleSpawnPoint."
Drag and drop the BubbleSpawnPoint GameObject onto the BubbleSpawnPoint field in the UIManager GameObject.
Configure GameManager Prefab:
In the Hierarchy panel, right-click the GameManager GameObject.
Choose "Create Empty" to create an empty GameObject inside the GameManager.
Name the empty GameObject "GameManagerPrefab."
Drag and drop the UIManager GameObject onto the GameManagerPrefab GameObject to make it a child.
Drag and drop the BubbleController Prefab (created in Step 3) onto the GameManagerPrefab GameObject to make it a child.
Drag and drop the MathFactGenerator Prefab (created in Step 3) onto the GameManagerPrefab GameObject to make it a child.
Attach the GameManager.cs script to the GameManagerPrefab GameObject.
Set Up Buttons for Answer Choices:
In the Hierarchy panel, create four UI buttons and label them with numbers 0 to 3.
Assign the PopBubble() method of the BubbleController script to the OnClick event of each button, passing the corresponding number as the argument.
Save and Run the Game:
Save the scene and your project by pressing Ctrl+S (Windows) or Cmd+S (Mac).
Press the "Play" button at the top of the Unity Editor to run the game in the Play Mode.
Now your game should be up and running in Unity's Play Mode. The bubbles with random math facts will appear and bounce around the screen. Click on the bubbles with the correct answers to pop them and increase your score. The UI should display the current math fact and score as you play.
Conclusion
As always, Enjoy and never hesitate to hit me up with questions, comments, jobs, or anything tech related!!! Please ❤️ if you find value and subscribe to the newsletter for more articles about React, Web Development, AI-Language Models (ChatGPT), React Native, Typescript, TailwindCSS, Tutorials, Learning Aids, and more!!!
Jon Christie
